Saturday, March 23, 2013

Ghost Automated Restore Boot CD/DVD part 3

Ghost Automated Restore Boot CD/DVD part 3

Step 1 Select Data disk & OK

Step 2  Disk/Boot Option


Step 3
·         Tick Make disk bootable
·         Find your .ima boot disk
·         Select Floppy 2.88MB
·         OK


Step 4 
  • Drag your CDR00001.gho etc., files down to the lower right pane.
  • Click Burn far left icon.
  • Finished.
  •  
  • Put disk into PC and 20 mins later should be good to go.

Wednesday, July 18, 2012

Ghost Automated Restore Boot CD/DVD part2

Ghost will burn a series of 2gb files to DVD


CDR00001.GHO

CDR00002.GHO
CDR00003.GHO
etc..

Copy those files to somewhere on your PC. 


Now you need to create the boot disk and for that you will need to get WinImage. I use the portable version.

You will also need to get a win98 or XP dos boot disk. If you don't have boot disks you can get them from here.


You will need to edit the autoexec.bat file. Mine looks like this;


@ECHO OFF

PATH=A:\;A:\DOS;A:\GHOST;A:\NET

LOADHIGH MSCDEX.EXE /D:shane /L:T
LOADHIGH MOUSE.COM
GHOST.EXE -CLONE,MODE=LOAD,SRC=T:\CDR00001.GHO,DST=1 -SURE


My config.sys file looks like this;


DEVICE=HIMEM.SYS

BUFFERS=20

FILES=60
DEVICEHIGH=gcdrom.sys /D:shane


You will need to find gcdrom.sys on a search engine as win98 & xp boot disks used oakcdrom.sys (old IDE) for the CD/DVD driver but newer PC's use Sata and for this you need gcdrom.sys


To create a boot disk copy the contents from your a:/ drive (your floppy disk) or the contents from the boot disk you downloaded into WinImage. Make sure you select 2.88MB as all the dos files and the ghost.exe file won't fit onto a standard 1.44MB formatted boot disk. Make sure to include the edited autoecec.bat & config.sys files to WinImage :)


Now edit the Boot sector properties to the following.


Select Windows 95/98 or Win NT/2K/XP. I use 95/98 and never have problems. If you don't do this step and create the boot disk you will find that your PC never boots up and just freezes during dos POST. 

Now that you have your ghost files (cdr00001.gho etc., etc.) and your dos boot disk ready you just need to burn the whole project to DVD.

Part 3 to follow...


Thursday, June 21, 2012

Ghost Automated Restore Boot CD/DVD


Guide on how to create an automated Ghost Restore Boot DVD. Comes in handy when you have a client that knows little to nothing about IT so you can give them a pre-made restore DVD that they just whack into their drive and in 20 mins they have their OS back up with no user input needed.


Setup the target computer how you want, install the OS, Office, Winrar, Drivers etc., keep in mind any OS from Windows 7 and above rarely fits on 1 DVD. Once you have the PC setup how you want it then you need to make a Ghost Image of it.

Reboot the PC with Hirens CD and run ghost. This guide is simple so I won't be showing how to restore a partition but rather a disk restore. If you just want to restore a partition then it's a simple matter of adjusting the Autoexec.bat script. Keep in mind that a disk restore will completely wipe/destroy ALL data on the Hard Drive. I have in the past created auto restore dvd's that restore just the C partition (The OS) and leaves all other partitions alone on the HDD.

When ghost has loaded,


  1. Insert a blank DVD
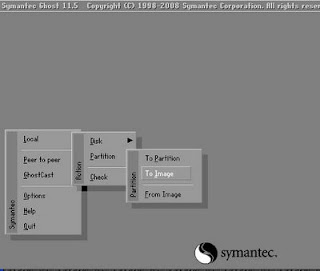
  2. Local/Disk/To Image.
  3. Select the drive you want to image
  4. Select DVD drive as where you want to save the image to.


This will create an image of your target PC on 1 or more DVD's depending on how much data is on your drive.


Once you have the image on DVD's then you need to goto your work/desktop PC and now create the automated ghost part.

End or part 1...

Wednesday, June 2, 2010

GA-P55 can't install chipset drivers

I bought a GA-P55A-UD3R rev1 mobo and installed Windows 7 64 bit. I installed the latest mobo INF chipset drivers and when I checked device driver versions in device manager nothing had been updated.


All the versions were 6.1.7600.16385 which are default Microsoft drivers from 2006. Nothing i did could get the mobo drivers installed, run as administrator did nothing.

Finally found out thanks to this post how to do it.

CMD into the folder where the setup.exe is and at the cmd prompt type "setup.exe -A" that will extract the inf files to C:\Program Files (x86)\Intel\InfInst\Inf

then type "setup.exe -OVERALL" That will force the overwrite of all the inf drivers. Reboot and you will have up to date mobo drivers.

Windows 7

Some useful information for setting up Windows 7


#1 Want to auto login to MSN hotmail when you click on the MSN mail link but Firefox or your default browser takes you to a sign in page where you have to manually enter the password?


Then you need this tool Hotmail in IE, it will make it so emails will open up in IE but you can keep your default web browser as something else.

#2 Disable autoplay for CD/DVD & USB

1 Click the Start and Input "gpedit.msc" in search box, then click the result to open the gpedit
2 Expand Administrative Templates >Windows Components > Autoplay Policies in order.Then double click "Turn off Autoplay"
3 Click Enabled, and then select All drives so that you can disable Autorun on all drives.Click Ok at last.
4 After restarting your computer, you have done all the needed work to disable Auto Play in Windows 7.

#3 If you want to stop other users/accounts from logging into your PC and only allow yourself access to the PC

Local Security Policy, User Rights, Deny Logon Locally. Explicitly assign the users you don't want to be able to log into the local PC

Thursday, January 28, 2010

EZcool Vimicro Webcam


EZcool 1.3M 500K webcam with LED lighting

If you have lost your driver or can't find a driver to install on Vista or Windows 7 64 bit and you have one of these cheap but good asian webcams, it more than likely is a Vimicro webcam that has been rebadged.

Go to their homepage here and download their Detection Tool direct link to tool.

That tool detected my cam straight up, click on the link that is most suitable to your OS, for me I have win7 64bit, they didn't have those drivers but they had Vista 64 bit drivers and it works great now.

Saturday, November 14, 2009

Hacking & Jailbreaking Iphones

If like me you are having lots of trouble jailbreaking your iPhone then maybe this will help.

Scenario:

A friend gives you their iPhone or a friend of theirs iPhone and asks you to fix it becuase somehow it has become locked and unusable and when you turn it on all you get is the Emergency Phone number screen.
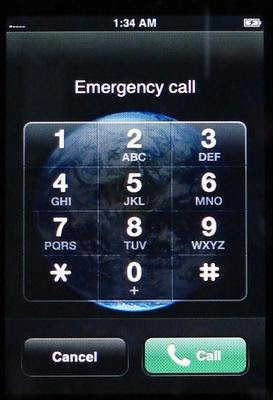


They tell you it happened after iTunes updated their phone.

In my case I have received 2 phones from people to fix.

1) was bought through Optus and was carrier locked, the person never even activated the phone, new straight out of the box and wanted me to unlock it so they could use another sim card. When I received it the only screen I could get was the above emergency screen. Obviously my simcard (another carrier) wouldn't work and I didn't know anyone with an Optus sim to test it with.

2) Another phone I got was from a person who bought it in USA, obviously it was at some point carrier locked to ATT, but it must have been jailbroken as they were using it in Australia and it worked fine until iTunes updated it lol

In both scenarios I received phones that did not work and were locked into the emergency phone number screen. I had no way of knowing what version phones they were, what OS they last had been using (the people who owned them were clueless and would have no idea).

So off I go to Dev Teams site and d/l reds0w & 3.01 ipsw and run through the steps to jailbreak. On a side not - I prefer to use the old dos redsn0w as you can see what's happening.

But anyway, on both phones I always ended up with the same result, redsn0w would do it's job, and it would either hang at the "waiting for reboot..." screen, or if it did install it would reboot back into the emergency phone thing as if nothing had happened, but redsn0w was reporting it worked fine.

I worked out that with the hanging on waiting on reboot part I was using the wrong ipsw, example; the phone from USA was a 2G (I didn't know, how could I? you can't boot into the phone to find out the OS as it is locked to the emergency phone thing). So I d/l the ipsw for 2G and bingo, no more waiting for reboot... hang.

But still on both phones redsn0w would do it's thing, phone reboot and back to the emergency lock. I would run the hack over and over 5-6 times and be stumped. Why wasn't it working?????

Then it dawned on me, if you are using the wrong revision number ipsw to jailbreak then it simple won't work. For example;

Phone A actually has OS 2.2.1 on it, you of course have no way of knowing this as you can't boot the phone up to see what OS is installed.

You d/l ipsw 3.0.1 and are using reds0w to jailbreak. Bam, that is your problem, you are using the ipsw 3.0.1 to try and jailbreak the iPhone 2.2.1 OS. It simply won't work.


You need to match the physical iPhone OS to the ipsw you are using with redsn0w.

So 1st thing you need to do is force iTunes to update your phone to an OS you know.

1)Have iTunes open.
2) Hold down Power (top or Sleep/Wake) and Home buttons for about 10 seconds until phone turns off (screen goes dark) to reboot iPhone.
3) Right after iPhone is off, release the Power (top) button but continue to press and hold the Home button. After about another 10 seconds, iTunes will detect iPhone in restore mode and automatically launch itself to restore firmware to the phone.
4) This will put your iPhone into recovery mode within iTunes. If the above steps didn't work for you then google how to use recover mode in itunes.
5) When iTunes detects you phone and tells you, you need to restore it, hold down the shift key and click on restore.
6) iTunes will then allow you to browse your computer for a ipsw file to restore your iPhone with.
7) locate the 3.0.1 ipsw you d/l from dev team and let iTunes install that OS.
8) When you phone finally reboots you will still be presented with the "Emergency Phone Number" Thing, but guess what? You now know with 100% certainty that your phone has OS 3.0.1 installed on it. You know this becuase you just made iTunes do it.

Now.... Go through the redsn0w steps and use the same 3.0.1 ipsw and BINGO!!! when your phone reboots it is now jail broken. You can use all the phones apps and make calls etc.

If you can't make calls then you need to unlock it as well, google how to do that, it is a simple process of going into Cydia App that the jailbreak process created for you and entering the repo666.ultrasn0w stuff.

Also if you want to install cracked apps, you will also need to go into Cydia and

1) Manage/Sources
2) uptop right side of screen press "Edit"
3) then on top right screen press "Add"
4) http://cydia.hackulo.us and press "Add Source"
5) Press on "Changes" on the bottom of screen
6) Look for a program called "AppSync 3.0" or AppSync 3.1 and install it.
7) Then look for "Installous" and install that too.

If hackulo is down for any reason then you can get Appsync from another repository http://cydia.iphonecake.com

Now goto the iPhone main page and press the App called Installous and install any cracked app you like. I prefer to d/l the apps from This website here to my computer and use iTunes to sync the apps up, but either way works.

If you want to STOP your iphone from ever using your carrier to access the internet due to HIGH charges and always force it to use your free wifi then you need to change the APN in Cellular Data Network...If you are missing Cellular Data Network & you are on Three 3G then goto this page http://andrew.harrison.org/notes/3-carrier-bundle-for-iphone and follow instructions, the command for PC is C:\Program FIles\iTunes\iTunes.exe”/setPreflint carrier-testing 1

Once you have done that go to settings/general/network/Cellular data network/ & in the the "Cellular Data" section change the APN to something else, I just put a few ss at the end, then if I ever need to use Cell network in the future I just go back into it and remove the extra ss's and it will work.


I have jailbroken the new 3GS with the new iboot system with blackra1n, works fine, just a hassle that when ever you reboot iphone you have to have the iphone plugged into computer with blackra1n running to get it to boot up.